My month long trip to Asia actually started in mid-April.  I meant to post sooner but have just been busy...:D.  Better late then never right?  Here it is, first stop Hong Kong!

A few pictures of the cityscape highrises everywhere:


This picture was taken of from my hotel room.  We stayed at Harbor Plaza Resort City in Tin Shui Wai.  The hotel was nice but it was a bit out of the way....about 45 mins from anything.  So...we hopped on a Taxi to Ya Ma Tei for dim sum.... which was amazing!  Especially the Ma Lai Koh; so soft, and chewy with the right sweetness, and richness....


After Dim Sum we strolled around to explore the city (I was actually looking for Shanghai Street, which Florence mentioned to me, for buying kitchen stuff....Thanks Florence!).   We bumped into Tin Hau temple.  Of course, I had to stop by to pay my respects... 

Day 2:  of course more dim sum for breakfast; and then it was off to Aberdeen fishing village.

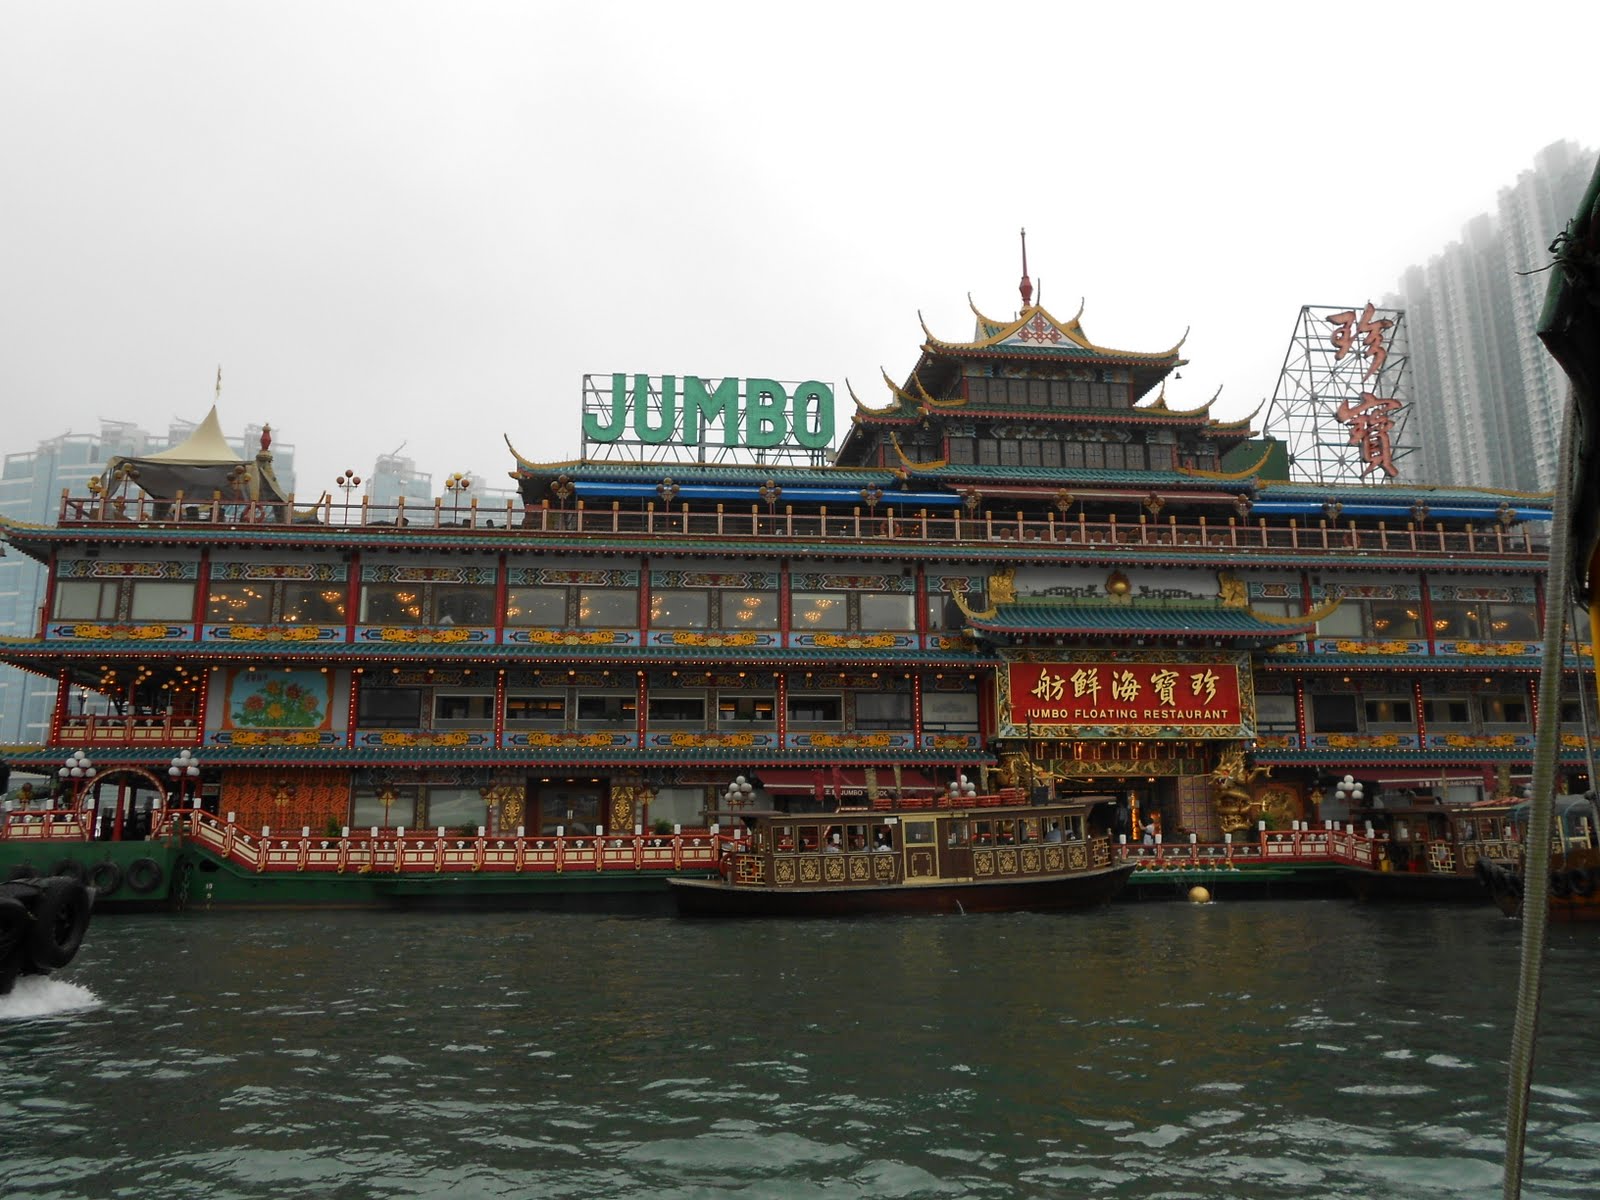
The famous Jumbo restaurant...Did not get a chance to eat there.   Although I would have liked to stop by for a meal; I assume most of their costumers are tourist....and well, tourist food isn't always the best food....


New building starting to pop up, right on the shores of the fishing village (what's left of it).  Apparently, the government is trying to reclaim the village (fill it with dirt to build more buildings).  Most of the villagers have moved on.  The 'traditional fishing village' is actually more like a bunch of small boat filled with tourist....sailing around witnessing the change that is happening.  I'm sad to say it's not much of a fishing village or any village...

Our tour dropped us off at a Jewelry Factory.   Yes...we went in knowing it's a tourist trap and yes, the prices are probably going to be much much higher then elsewhere...but we were already there.  The best you can do is not buy anything....right?  Right....just go in take a look and not buy anything.  So much for that!   The pendant you see above, modeled by yours truly originally cost $1600.   It's a luck Feng Shui pendent, it's a fan with a diamond in the middle. The blades of the fan represent good health, peace, happiness, and fortune.  The fan spins with movement (from walking) and makes a sound like a money counting machine. All of this is supposed to bring good luck to the wearer....  How cool is that!?!?  But for how much?  My mom got a smaller one, the price for that was supposed to be $250.  I told them $888 (luck number lol) for both..... and after about an hour of haggling they finally sold it for my asking price...more then half of their original price....  I'm positive the still made a profit...or else why would they sell it?  Although, I'm a pastry chef...I know I over paid....seriously, the diamond is in the middle is so small you can hardly see it, and there's not much gold/platinum in it...but hey! You only live once, and it's not like I go to Hong Kong everyday....at least that's what I telling myself.

Our tour continued into the City...a few pictures of the many high rise buildings in Hong Kong


Day 3:  Lantau Island/Po Lin Monastery


Our Vegetarian lunch....roasted pork, stir fried veggies with prawns, tofu, spicy mustard soup.  Delish!
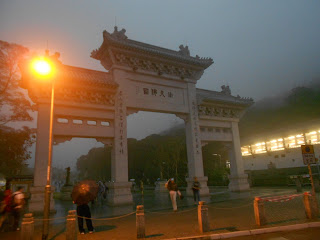


We actually set out to the temple at around 11am.  I was warm and sunny at the base of the island but as soon as we got to the top/temple it was dark and raining....as you can see from the pictures above.  When I say rain I really mean RAIN!  Water was pouring down as if god was dumping buckets upon buckets of water down to earth.  The staircase leading to the giant Buddha statue became a waterfall.  I wanted to take a picture but it was raining so hard I was afraid to get my camera out.  Afterwards, due to the rain, everyone decided to leave.  Unfortunately, due to safety concerns the cable cars that take people to and from the temple does not run when the weather is bad.   So...a ton of people were waiting in line in the rain, for the storm to end and the cable cars to work again.  Our tour guide tried to call a taxi to bring us down but were all "booked"....he called again and told them we were willing to pay an extra $40 and what do you know!  The taxi came in 5 mins. 


A few pictures of the Buddha statue that I was able to snap during the brief moments that the rain stopped...  It was such a beautiful place, I only wish the rain came happened....  I guess it was just not meant to be.

What's for dinner?  Roast goose of course!  Hong Kong is know for Dim Sum and roast goose.  My mom always told me how she remembered my Grandpa/her dad brought a roast goose home from his visit to Hong Kong. She remembers it vividly how it was still warm (Hong Kong is just a 2 hour fight from Vietnam), and juicy, and meat being fragrant and the skin melting in her mouth; savoring every bite as they had the goose for dinner that day.   With so many places to eat how do you know who's the best.   Luckly, Jacky the executive chef of Wild Ginger (where I work) is a native of Hong Kong.  He suggested Yung Kee.  So Yung Kee it is.....


Their roast goose was amazing, the meat was juicy and marinated just right with a hint of sesame oil which I think they drizzled onto the duck just before serving.    Although the sesame was detectable it was in now way overpowering, only adding to the goose making it every so memorable.  Besides their roast goose, they also make their own century old eggs served with pickled ginger.   The egg was made very well!  Not a hint of ammonia, very mild creamy yolk with a transparent chewy 'white'.   Yum!

Hong Kong has so much to explore an taste.  I was only able to scratch the surface during my short visit and hope to one day stop by again.   Wherever you decide to eat the food is always delicious, seriously.....always delicious....


 To everyone who showed up at my demo, THANKS FOR COMING. I apologize for not having enough copies of the recipes to handout... The recipes are posted below in case you didn't get a copy.  This was my first demo, and I think it went reasonably well.  Yes, I know, I need to speak louder and slower...I'm working on it...:)  Any feedback is much appreciated and anticipated.  Thanks for you support!  

Temple Rolls

Ingredients:
-2 potatoes
-2 bundles cellophane noodles
-4 tbs roasted rice powder
-1/2 cup fried tofu
-1/2 cup braised gluten
-1 tsp oil
-1 tbs soy sauce
-salt and pepper to taste
-fresh herbs, shredded lettuce
-rice paper

Method:
Peel and shred the potatoes. Rinse and drain the shredded potatoes before deep frying them until golden brown.

Soak cellophane noodles in hot water for 15 mins., drain and cut into approx. 2” long pieces.

Julienne tofu and gluten. Heat 1 tsp oil in a large wok; add soy sauce, tofu and gluten. Stir fry ingredients for a few mins, add salt and pepper to taste.

In a large bowl, mix everything together.

Quickly dip a sheet of rice paper in warm water. Place a lettuce and herbs in the center of the rice paper, followed by the filling. Fold the 2 ends in towards the middle and roll. Serve with dipping sauce (recipe follows).


Dipping Sauce:
-2 tbs each: crushed pineapple, sugar
-4 tbs coconut juice or water
-1 tsp each: soy sauce, salt, fresh lime juice


*Mix everything together.
________________________________________________

Taro Rice Pudding with Pandan Coconut Milk

Ingredients:
-1lb taro
-1/2 cup sugar (to be mixed with taro)
-1 cup sweet rice aka glutinous rice
-4 ½ cups water
-1 ½ cups sugar
-½ tsp salt
-2 pandan leaves, knotted

Method:
Peel taro and cut into bite size pieces. Steam until taro pieces over high heat for approx. 15 mins or until tender. Gently toss cooked taro with ½ cup of sugar and rest for at least 1 hour.

In a large pot, bring pandan leaves, salt and 4 ½ cups of water to a boil, add rice (rinsed) and simmer for 10 mins. After 10 mins, check the rice, it should be cooked (transparent) on the outside but still white on the inside; add 1 ½ cups sugar. Simmer for another 5 mins before adding the taro mixture. Continue to simmer, stirring occasionally for another 15 mins or until the rice is cooked. Served with pandan coconut milk (recipe follows).


Pandan Coconut Milk:
-1 can coconut milk
-1/2 tsp salt
-1 tsp sugar
-3 pandan leaves, knotted
-1 tsp cornstarch + 3 tbs water

*In a saucepan, bring coconut milk, salt, sugar and pandan leaves to a boil. Add cornstarch mixture and mix well until the milk thickens.
Tết is lurking just around the corner which means there are things to check out left and right.  If you're looking for something to do....

This Saturday and Sunday the 29-30th, Tết in Seattle will be holding their annual event at the Seattle Center.  Come join the fun!

And....if you come on Sunday the 30th don't forget to check out the cooking demo from 2:45- 3:15PM.  Yours truly will be there cooking up a storm.  What will I be presenting?  Good question, any suggestions? 

Also happening this Saturday the 29th, Chùa Việt Nam will be making Bánh Chưng (Rice Cakes) and Chả Chay (Veggie Mock Meat Loaf) to sell for their annual fundraiser.  Come join the fun! We're starting at 9am and finish...when we finish.  Lunch will be provided, vegetarian...of course.  If it's just the rice cakes you're after, they're $7.00 each and will be available fresh and hot Sunday morning.  Our address is: 1651 S King St. Seattle, WA 98144

Be there or be square!

With Tết just around the corner, it's time to fire up the stove and start pumping out sweet munchies!  Bánh Tổ is a must have for Tết.  There's no better time then now to fine tune your banana leaf mold making skills.  The recipe for Bánh Tổ can be found here.  Instead of steaming the cakes in rice bowls, the batter is steamed in banana leaf molds.  Don't have time?  The molds can be make in advance and stored in the fridge.  Ready? Set? Let's do this!

Step 1: wash the leaves and dry them with a towel, cut the leaves into approx. 1 foot wide pieces


Step 2: Stack 2 pieces of leaves so that they crisscross like so...

Step 3: Place a bowl/container (I used a plastic togo container) in the middle of the leaves, fold up the top and bottom sides of the leaves towards the container.


Step 4: Fold up the right side like so, then fold in the two corners.


Step 5: Use a toothpick to pin the 2 corners together.  Now repeat step 4 on the left side.
 

Step 6: You're almost done!  All that's left now is to 
trim the rim of your newly created mold with sissors.
That's it! Now all that's left is to fill them and steam...don't forget to stamp your cakes with red coloring (of course...) for luck!  Don't own a stamp? Go buy one :D....or.....cutout a few images from a lucky red envelope (bao lì xì) and use those! 

Have Fun and Happy Tết Everyone!


Hello all!  The calendar says Christmas will be here in couple of days...then comes 2011 and then the year of the Cat (I'm Vietnamese...we don't have rabbits in our zodiac, lol!).  Man oh man... how time flies!  I've been so busy lately...to busy to post anything or ever take pictures.  Things are calming down now and I owe it to myself to say hi to everyone out there who still visits.

***Hi, hope you're doing well!***

Seeing the picture above you've probably already figured out what I've been up to, but...it doesn't take 4 months to create a Gingerbread house right?  Or does it? No it doesn't.  The Gingerbread displays were created for Wild Ginger and The Triple Door...where I've been working at since August.  I made the Pagoda (yes, I know it looks like a Church), which is on display at the Triple Door.  The train and the Christmas tree made by my pastry team - Aja and Davona; are on display at Wild Ginger Seattle (train) and Wild Ginger Bellevue (tree).  Come check it out! While you're there why not have dessert made my yours truly?  

Happy Holidays Everyone!


Sương Sáo aka Grass Jelly is a dessert/drink popular throughout Southeast Asia.  According to Chinese medicine it has "cooling" properties and is good for the skin.  Grass Jelly is actually made from a dried herb that is a member of the mint family...not grass as the name suggests.  The herb's name in Chinese which is "len fan chou" (cooling grass). Thus, jelly made from cooling grass is....you guessed it Grass Jelly.

You can purchase Grass Jelly at just about any Asian grocery store for dirt cheap...but where's the fun in that?


"Grass" to make Grass Jelly can be found at most Chinese Herbal/Medicine Shops.  Rinse/wash the grass, add water to cover the grass by 2", simmer for at least 1 hour. 


Cool and strain the grass through a cheese cloth or a fine sieve or...both.  The liquid obtained will be used as the base to make grass jelly.


To make grass jelly.....
Use a measuring cup to measure the liquid obtained after straining out the herb.  Dilute that liquid with an equal amount of water.  For example, if you got 2 cups of liquid add 2 cups water (+/- depending on how pronounced you want you jelly to taste).  For every 6 cups of diluted liquid you will need 75g of tapioca starch (+/- depending on how firm you want you jelly to be).

Bring 5 cups of liquid to a boil.  Meanwhile, dissolve the tapioca starch in the remaining 1 cup of liquid.  As soon as the liquid in the pot begins to boil, stir in the starch mixture.  You'll notice the liquid will thicken immediately.  Mix well and fast, then pour the mixture into a clean bowl and allow to set.  The jelly set right before you eyes...literally.  In about 20 mins the grass jelly is ready to be served.

To serve: cut the jelly into small pieces, mix with sugar or honey...grass jelly also pairs exceptionally well with Nước Rau Má (Pennywort drink)....I was going to post a recipe but my dear friend Lily beat me to it...you can find her recipe here http://lilyng2000.blogspot.com/2010/07/pennywortpegaga-drink-secret-fountain.html 

Just in case you're wondering...this isn't 'real' grass jelly since the starch is setting the jelly and not the grass.  I thought so too...so I experimented.  I tried to thicken 6 cups of water with 75g of tapioca starch to see if the liquid would set like grass jelly....it didn't...as you can see from the picture below.  The white mess in the bowl is the water + tapioca starch vs. grass jelly + tapioca starch.  


The starch triggers a chemical reaction with the grass jelly liquid to set the jelly.  The starch alone can not do the job.  Besides tapioca starch you can also use corn starch, mung bean starch, arrow root starch or rice flour.  However, I found that tapioca starch gives the jelly the best appearance (clear and pitch black). If you prefer a very soft jelly, use 30g of starch (it's the minimum amount of starch you'll need to set 6 cups of grass jelly; the more starch the firmer the jelly).  For a slightly chewy texture add 1/2 tsp lye water
A Vietnamese favorite with Chinese origins, Mì Vịt Tiềm is composed of fresh egg noodles, shiitake mushrooms, watercress, and a braised duck leg quarter.  The duck is braised in a mix of spices creating a rich flavorful broth for the noodles.  Condiments include hot mustard, and pickled green papaya and carrots. 


For the Braise Duck:
**For every pound of duck**
-1/2 tsp salt
-1/4 tsp 5 spice
-1 tsp cooking wine
-1 tsp dark soy sauce
-1/2 tsp honey or maltose
-2 slices of ginger
-oil for deep frying
-a few shiitake mushrooms

*Rub the duck leg quarters with ginger, salt, 5 spice and cooking wine.  Marinate for at least 2 hours, pat dry with a towel.   Combine honey and soy sauce, bush the mixture over the duck leg.  Deep fry the legs until golden (doesn't need to be cooked all the way, just aim for color).  Reconstitute the mushrooms.

Meanwhile, in a large stock pot to toast...

-1/2 tsp fennel
-1 clove
-2 star anise
-3 pieces/slices of licorice root
-1 piece of cinnamon about 1/2 inch long
-1 piece of dried tangerine peel

...until fragrant add water and...

-2 tbs soy sauce
-1 1/2 tsp salt
-1 tsp sugar

...bring to a boil.

Add the duck legs (fried), and mushrooms.  Add more water if necessary to cover the duck.  Simmer over low heat for about 45 mins or until the duck is tender. 

Serve with fresh egg noodles (blanched) and watercress, bok choy, yu choy or iceberg lettuce (I prefer watercress, it's peppery taste goes well with the duck).


The noodles are served with pickled green papaya and carrots. Hot mustard is perfect for dipping the duck into. To make the pickled green papaya and carrots use this recipe, replace the daikon with thinly sliced green papaya.
What's an orchid cake?  If you've ever tasted Sponge Cake or Génoise you've tasted Orchid Cake.  Bánh Bông Lan/Orchid Cakes are small sponge cakes baked the old school way.  Although génoise's family tree traces it back to Italy; cake was introduced to Vietnam by the French.

What's with the name?  Génoise are often flavored with vanilla.  Vanilla comes from/is an type of orchid.  Orchid in Vietnamese is "Bông Lan", thus the name Bánh Bông Lan - Orchid Cakes.  Traditionally, the cakes are baked in a cast iron mold heated with charcoal.  Modern ovens make baking these cakes much less laborious...but some how I still prefer the traditional way...nothing like sitting outside on a mild spring day, enjoying the light breeze, the bright shinning sun and baking sponge cakes. 

Ingredients:
-4 egg (200g)
-120g flour
-120g sugar
-1 tbs tsp oil or melted butter
-1 tsp vanilla powder or extract

Method:
Beat the egg whites with the sugar until stiff peaks are formed.  Add the yolks one at a time.  Sift and fold the flour into the eggs.  Fold in the butter and vanilla last.

To Bake: 


 Preheat the mold, brush each cavity with a cotton ball dipped in oil.


Fill until 3/4 full of batter.


Cover and bake for about 3-5 mins.
Hoa Thủy Tiên literally translates to "Water Angel/Fairy Flower". It's, or shall I say "her" botanical name is narcissus tazetta and they're a variety of narcissus (daffodil, paper whites, etc...). The bulbs are forced in water to set off graceful flowers for Tết - Chinese/Vietnamese/Lunar New Year. Thus, the name "Water Angel/Fairy".

Angel or Fairy? In Vietnamese, Tiên is a mythical being from the heavens who is beautiful and graceful while possessing supernatural powers. Although Tiên can be either male or female....it usually implies female. For example, Chị Hằng Nga of the mid-autumn festival. Angel for fairy? I'll let you decide.

There are 2 ways to force these bulbs into blooming. One is to simply stick the bulbs in a container filled with water, change the water every few days and in about 6 weeks you'll see angels. The second method is more traditional and complicated. The bulbs are "carved" to expose the flower buds and then placed in water. As the leaves and stems grow, they too are carved to manipulate them into their graceful shapes. With this method, the bulbs should bloom in 20 days (+/-). As with all plants temperature plays an important role, if the temp is too warm, then they'll bloom earlier and vice versa. You can somewhat control how fast they bloom by controlling the temperature of the water. It is desirable to have the flowers bloom exactly at midnight on the eve of the New Year….so plan accordingly.

*Click on the pictures for larger images*

 
Step 1:  The bulbs will look like this when you buy them from the store.  Look for ones that are plump, white with plenty of bulbs attached (each bulb is a flower stalk); each attached bulb should be at least thumb size (smaller ones won't bloom).

  
Step 2:  Using a sharp paring knife, begin carving away the outer layers of the bulb (the bulb is made up of many layers like an onion).   Use extreme caution as you get to the center of the bulb.


Step 3:  Only cut away half/one side of the bulb like in the picture above.  Stop once you get to the young shoots in the center (if you look closely you'll notice the flower buds are already set).  It's ok if you damage the leaves but if any of the flower buds are hurt they will not bloom. 


Step 4: Soak the bulb cut side down in cold water.  Soak for 2 days, changing the water and carefully washing the bulbs everyday. 


Step 5: After 2 day, flip the bulb over and soak it for another 2 days, changing the water everyday. 


Step 6: Next step is to place the bulb into a vase/container, use rocks, marbles, etc...to anchor the plant if you need too.


Step 7: Cover the cut surface of the bulb with a wet paper towel or cotton, fill the container with fresh water.  Make sure the towel or cotton touches the water underneath (or else it will dry out, defeating the purpose of using it to keep the top of the bulb moist).   Change the water every few days....sit back, relax and watch your angel bloom.  

**As the plant grows you can trim/carve the leaves and flower stems to turn them into unique patterns.  For the leaves, just trim away a small sliver of the leaf.    The leaf will bend/curl towards the side that's been trimmed.  Same goes for the stems of the flowers.  DO NOT touch the flower heads/buds.  Any damage to them will cause the bulbs to abort the flowers.**

I'll post an update when mine's bloom...but until then...you can google "hoa thuy tien" for a few images, if you're curious.


Vietnamese 101....

Bánh = pastry
Gai = thorn
Đuông = a type of worm, found in the heart of coconut and palm trees

Thus gives us the name for these cookies.

They are somewhat related to "Dragon Cookies" which are found in other Southeast Asian countries such as Malaysia during Chinese New Year. The Vietnamese version is a bit more complicated in ingredients.  In this speciality, traditional Southeast Asian ingredients such as tapioca starch and coconut milk are paired with French influences of butter and condensed milk.....goes to show the east meets west concept is not just a fad it's..., well....it's history and tradition.  The texture and method for making the cookies very much resemble Les sablés pouchés (piped shortbread cookies).  The worm shape is strictly Vietnamese.

Ingredients:
-100g all purpose flour
-100g tapioca starh
-80g sugar
-25g coconut milk
-1 1/2 tbs condensed milk
-20g butter, melted
-2 egg yolks
-1/2 tsp baking soda
-1/2 tsp lemon extract 


What to Do:
Sift together flours and baking soda.  Whisk together sugar, coconut milk, condensed milk , butter, egg yolks and extract.  Add the flour mixture to the mix of wet ingredients.  Mix to form a slightly sticky dough.

To Make Bánh Gai:
Fit a star tip into a piping bag and fill with cookie dough.  Pipe the dough onto a baking sheet.  Traditionally, these cookies are made with the aid of a specially created mold.  The mold works like a cookie gun. However, if you live outside of Vietnam or Asia...chances are pretty slim that you'll be able to get your hands on one... The pastry bag works just as great.

To Make Bánh Đuông:
Add 1 tbs tapioca starch to the above dough (the dough should be firmer).  Pinch off small pieces of dough and roll them between the palms of your hand to turn them into worms.  Use a clean comb to give the worms the signature indentation. 

Bake the cookies at 350'F until golden (about 12-15 mins).