Most chips sold in stores are “floured down”. The producers use more flour than shrimp to boost profits. As a result, shrimp chips or crackers end up tasting nothing like shrimps. This recipe produces a heavily shrimp flavored chip/cracker. If you prefer store bought flavor more simply adjust the ration of shrimp to starch. The weight of starch can be up to 3x the weight of shrimp.

Ingredients:
-500g peeled and deveined shrimp
-250g tapioca starch
-2 scallions (white part only)
-3 cloves garlic
-1 ½ tsp salt
-2 tsp sugar
-1/2 tsp powdered “squid bone
-whole peppercorns (optional)

What to Do:
Mince scallions and garlic and add to shrimp, sugar and salt. Process shrimp in a food processor into smooth paste. Add powdered squid bone and tapioca starch and mix well. Roll paste into a log and wrap plastic wrap or foil and boil or steam for about 1 hour. Cool and slice into thin chips, before drying in the sun or a food dehydrator. Store dried chips in a cool dry place for up to a year.

To Serve:
Heat oil to 375’F add chips one at a time and fry until puffy and golden (chips will expand 3-4x its original size when fried). For healthier eats, just nuke the chips for about 30 seconds in the microwave.

Note:
Squid bone” is the thin bone plate found in squids/cuttlefishes. They can be purchased dried from Chinese Herbal Medicine shops. To use, simply scrape with a spoon to get a fine powder. This is what gives the chips its crispy and puffy texture.

Let’s see…to be honest, I’d have admit I don’t miss anything. It’s not that my mom’s food was a terrible; it’s very good. The reason is I’m still in the nest and thus, fortunate enough to have a frequent dosage of my mum’s cooking. So, with that being said, here’s a list of the 10 things I like most about my mum’s cooking.

1: Bánh Bò (Steamed Rice Cakes)
I remember she used to make these rice cakes for me to snack on when I came home from preschool. Sadly, I only had a few shorts years to enjoy these cakes, as she soon got a job and was too busy to make them anymore. It has been 15 years since she’s made bánh bò. I’m sad to say the recipe is also gone. I’ve been able to come up with a recipe for bánh bò but for some reason mine’s are just don’t taste the same although I use the same ingredients she did. Maybe it things tasted different to a child then an adult…maybe my recipe is missing the most important ingredient of all…a mother’s love.

2: Bún Tàu Gà (Cellophane Noodles with Chicken and Dried Bamboo)
The ultimate comfort food. I can vividly remember how she would make a large bowl and fed me as she ate.

3: Kit Kats and Gummy Bears
Ok an acceptation here…obviously she didn’t cook these but she would remember to buy them for me everything she/we went to the market. Way back when I was about 4 or 5 I would go tag along with my mom every time she went to the store. After the shopping was done, my mom walked out of the store with a bag of groceries in one hand and her other hand would be holding onto my wrist. As for me, one hand was holding the candy and the other hand was used for stuffing the candy into my mouth….and occasionally giving passing on a piece to mom.

4: Cháo Trắng với Dưa Măm (Congee with Marinated Cucumbers)
My mom would make this every time I’m sick. She would boil the rice until it was a perfect consistency. As the congee was cooking she would marinate the cucumbers to perfections with minced garlic, chilies, sugar and fish sauce.

5: Sương Sa (Agar Agar Jelly)
She would make it form whole agar agar (not the powdered) and flavor it just right. After setting the jelly was put in the fridge to chill. Once cold, she would the jelly into little squares before handing them over to me to snack on.

6: Ga Chiên Mặn (Salty Fired Chicken)
So simple to make but so tasty. All you have to do is sprinkle salt onto some chicken and fry until golden. My mom would shred the chicken into small pieces so I wouldn’t get my hands dirty by having to deal with the bones. How thoughtful of her…

7: Khoai Mon Luộc Chấm Đường (Boiled Baby Taro Dipped in Sugar)
“Lột từ ở dưới củ khoai lột lên theo xoáy của vỏ…” in English words, “Peel the taro starting from the top going along natural spiral of the peel”. This is what my mom would always tell me whenever we had these as a snack. For some reason, no matter how many times my mom would teach me to peeled the taro I just couldn’t do it. My mom would smile so sweetly when she saw me trying and then gave me a few bites from the taro she was eating.

8: Trà Cúc (Chrysanthemum Tea)
My mom would boil a big pot and sweetened it with just the right amount of rock sugar. The sweetness from the sugar and the fragrance from the chrysanthemum flowers were always in harmony with each other. There would always be a pot of this especially in the hot summer months as the tea has “cooling” properties.

9: Nước Đá Chanh (Limeade)
Lime juice, sugar and water stirred together. My mom would make this before she left for work in the morning for my brother and me to drink when we got home from school. Her limeade is not like others which are sweet. My mom makes the drink more sour than sweet which is just the way we liked it to be. A cold glass of limeade and a piece of beef jerky. Life was sooooooo good.

10: Khoai Môn với Thịt Quay Hấp Chao (Steamed Taro with Roasted Pork)
My mom is half Hakka and half Cantonese. Every time she could buy good taro she would make this Hakka dish. The ingredients consist of roasted pork, preserved tofu (aka bean curd), 5 spice, pepper, soy sauce, garlic and taro. Everything except the taro was mixed with the pork. Then the pork and taro are arranged alternatively into a bowl and steamed. My mom knew I love eating taro would always make sure she added extra taro in the dish just for me.

Humm…..my meme sounds more like a recall of childhood food than 10 things I miss…all well. For me food and memories go hand and hand. As the wheel of time rolls us all along I’ve developed an obsession with food and cooking and my mom has…well…she never liked cooking in the first place. Now that she has found someone to gladly take the job she has stepped down and only cooks when she feels like it. Leaving me with more time in the kitchen to play with my food :D. Next up… Lily's Wai Sek Hong, Jan’s Kitchen, Jingle’s Kitchen.
Spring rolls or Egg rolls…which is the correct name to call this? Let’s call it by its Vietnamese name Chả Giò. What makes a good Chả Giò? First of all, the filling should be juicy but not soggy. When you take a bite into a Chả Giò you should notice the crispy texture. Furthermore, the rolls should be somewhat dense, meaning the filling should be tightly rolled up within the wrapper to ensure the filling does not fall all over the place when you munch on the rolls.

There are also many ways to serve these delights. Most common is to serve them as a snack or an appetizer. Many prefer to serve Chả Giò with rice vermicelli, fresh herbs, beans sprouts, cucumbers, sour stuff, crushed roasted peanuts, fried shallots, and fish sauce…sound familiar? This way of serving is known as Bún Chả Giò (pictured above) which translated into English, just means noodles with egg rolls. However, it has come across my ear many times that some people also call this a “salad”…probably because we use so much fresh veggies in the dish that it seems like we’re eating a salad…but we’re not. I would like to make it clear that we are eating noodles with egg rolls; the veggies are just a “condiment”. Another method of serving is to take a piece of lettuce and use it as a wrapper; fill with an egg roll, fresh herbs, sprouts, sour stuff, dunk the roll in fish sauce and into the mouth it goes. A little messy but soooooo good.

Traditionally Chả Giò is wrapped using Bánh Tráng (rice paper). However, using wrappers made of wheat flour is much more convenient and easier to work with. Thus, almost everybody these days uses premade wrappers which can be found in the frozen section of 99.99% of all Asian grocery stores. Try to avoid egg roll wrappers sold in American or “western” grocery stores as they tend to be too thick and doughy. They are actually many versions of fried spring/egg rolls. This is the basic recipe. With the recipe below you can tailor it to make the other versions.

Ingredients:
-1lb ground pork
-2 carrots
-1/2 onion
-1 Bundle of cellophane noodles
-5 Nấm mèo (dried woodear mushrooms)
-1 tsp salt, 1 tsp sugar, ½ tsp pepper
-1 egg
-1 package spring roll wrappers (24 wrappers)

What to Do:
Peel and shred carrot into thin strips. Chop onion into little pieces. Soak black fungus and slice into thin strips. Cut noodles into shorter pieces. Mix everything together with one egg white (save the yolk for wrapping the rolls later). Put filling in the middle of wrapper and fold in the 2 sides and then roll starting at the bottom. Roll the as tightly as you can. Brush a little egg yolk on the top end of the wrapper secure the filling.

Frying Method:
For every 2 cups of oil add the juice of ½ a lime or lemon, or 2 tsp vinegar while the oil is still cool. Once oil is heated, drop in egg rolls and fry until golden. Frying time should take about 15 mins. If it is golden before that time; the oil it too hot which means, the filling might not be cooked, and spring roll will be soggy when cooled.

Different Variations:
Chả Giò Tôm Thịt (Shrimp and Pork):
Reduce the meat to 1/2 lb and add in 1/2 lb minced shrimp.

Chả Giò Cua (Crab):
Use 1 lb of crab meat instead of meat, or use 1/2 crab, 1/2 pork

Chả Giò Tôm Cua (Shrimp, Crab, and Pork):
Omit pork and replace with 1/2 lb of each shrimp and crab.

Chả Giò Khoai Môn (Taro):
add 1 1/2 cups shredded taro, and omit 1/2 the amount of cellophane noodles (use only 1/2 bundle of cellophane noodles)
**you can also make crab and taro spring rolls, shrimp and taro rolls, etc...

This is a Cambodian snack composed of glutinous rice flour, palm sugar and grated coconut. If you curious about the name… The story behind it is....once upon a time there was a newly wed couple. One morning husband went to work and the wife decided to make a treat for when her hubby returns. The husband returned just as the wife was done cooking the snacks. He quickly popped one in his mouth but it was still too hot and he ate too fast he started choking. However, he wanted look "manly" in front of his new wife so he acted like nothing happened and tried to swallow it down....sadly he didn't make it. Thus these snacks became known as husband killers.

Ingredients:
-1 package glutinous rice flour (1lb)
-water
-palm sugar
-1/2 coconut

What to Do:
Add water slowly to flour and mix to form a smooth dough that does not stick to you hands and can hold its shape. Break sugar into small pieces. Grate coconut into thin strips. Take a small piece of dough, flatten it and wrap a piece of sugar in the center. Boil rice balls until the float to the surface of the water. Remove to a bowl of cold water then to a colander to drain. Mix with grated coconut and serve.

Ingredients:
-2 cups shredded green papaya
-2 tsp: sugar, fish sauce
-salted baby crabs (as much or as little as you prefer)
-tomato and cucumber slices
-1 tbs dried shrimp
-Thai chilies (optional)
-Thai basil
-juice from ½ lime
-3 string beans

What to Do:
Slice string beans thinly and chop basil. In a large bowl pound dried shrimp, chilies, and sugar using a pestle. Add fish sauce and lime juice and mix to make “dressing”. Add papaya. Using both hands, one with a pestle and the other with a spoon gently pound and mix papaya with the dressing. Lastly, toss in crabs, beans and basil. Serve with tomatoes and cucumber slices.
Ingredients:
-1/2lb ground pork
-1/2 large onion
-1/2 tsp each: salt, pepper
-pinch of sugar
-4-5 large cabbage leaves
-4 scallions

What to Do:
Dice onion and mix with pork, salt, pepper and sugar. Cut cabbage leaves in half and remove stems. Cut the scallions in half lengthwise. Boil a pot of water and give the cabbage and scallions a quick dip, remove and drain. Fill each cabbage leaf with pork filling, wrap and tie with a piece of scallion. Simmer cabbage rolls in broth for approx ½ hour before serving, add salt to taste.

The tricky part about making this desert is figuring out the right ratio of yeast to rice. Too much or too little yeast can result in mold growing on the rice. The bottom line is you’re making wine, thus everything should be clean, dry, and accurately measured.

If Using Hong Kong Yeast:
-1 wine yeast ball (approx. 8g, about the diameter of a US quarter)
-1kg white or brown glutinous rice

If Using Vietnamese Yeast:
-1/2kg white or brown glutinous rice
-2 wine yeast balls (approx 5g, diameter about the size a US dime) or 5 small yeast balls (approx. 7g, diameter about 3/4 of a US dime)

What to Do:
Wash rice a few times; soak for a few hours (the longer you soak, the faster the rice will cook). If using brown glutinous rice than soak and cook as you would normal rice (in a pot with water). If using white glutinous rice, cook the rice by steaming. The rice should be tender and moist. Grind yeast into a powder. Spread cooked rice on a large tray and cool until warm. Sprinkle yeast over rice and mix. Wet hands with saltwater solution and form rice into small balls (this step is optional). Place rice balls in a clean and dry container, cover tightly and place in a warm place for rice to ferment.

How long it takes for the wine to mature depends on the temperature at which it ferments. The process usually takes a few days. After a few days there should be plenty of wine in the container…enough for the rice balls to float in. The longer you ferment the stronger the wine will be. Serve “young wine” as a dessert. “Over-fermented” wine could be used to make Bánh Bò in place of the yeast or, the wine could be filtered, boiled and use as a drinking wine or, to soak spices to make cooking wine.

Saltwater Solution for Shaping Rice Balls:
-1 cup warm water
-1/2 tsp salt

*Dissolve salt in water, the solution should have the saltiness of soup.
Ingredients:
-1/2lb beef
-1 large bittermelon about 1lb
-3 cloves garlic
-1/3 tsp salted preserved beans (tau xi)
-1 tsp oyster sauce
-1/2 tsp tapioca or corn starch
-3 tbs water
-1 tsp oil
-salt and sugar to taste

What to Do:
Slice beef thinly. Mince garlic and beans. Mix together oyster sauce, water and starch. Cut bittermelons in half length wise and remove seeds, then cut into thin strips. Heat oil in a wok, fry garlic and beans until fragrant add beef and bittermelon. Stir-fry over high heat until beef is cooked; add starch mixture and mix well until thicken.


Ingredients:
-100g butter
-100g sugar
-200g flour
-1 tsp vanilla
-1 egg (50g)
-1 tsp baking powder
-1/3 tsp baking soda
-food coloring
-maraschino cherries

What to Do:
Drain and dice cherries. Cream butter and sugar, add egg and vanilla. Mix in flour, baking powder, and baking soda. Add coloring (yellowing if making plum blossoms and pink if making cherry blossoms). Fill a cookie gun with dough and press cookies directly onto a baking sheet, add a cherry in the center. Bake at 400’F for 5 mins, reduce heat to 350’F and bake for another 5 mins.

Note:
If you do not own a cookie gun, use a pastry bag fitted with a drop flower tip.

I have come across numerous English translations for this cookie anything from button cookies, to coconut cookies. However, the literal translation of this cookie would Cookie Yeast. It is named so because the cookies look like yeast balls. This cookie is made with tapioca flour which explains why it is so hard to get the recipe right. Anyone who has worked with tapioca flour knows it is very hard to get it to hold its shape. The other hard part is to achieve the distinctive characteristics of this cookie which is mildly sweet with a hint of coconut flavor while at the same time have a light, crunchy yet melt in your mouth texture. These cookies could be bought dirt cheap at almost all Asian grocery stores….so why go through all trouble making them? Because it’s fun to play with your food. :D Furthermore, cooking and baking is an art not a matter of economics. And…because I’m crazy like that.

Ingredients:
-400g tapioca starch/flour
-75g rice flour
-150g sugar
-150g coconut milk/cream
-1 ½ tsp double acting baking powder
-food coloring and flavoring (optional)

What to Do:
Mix together 200g tapioca starch, rice flour, sugar, baking powder, add coconut milk and mix until smooth. Add food coloring and flavoring desired. Prove for ½ hour. After ½ hour add the remaining tapioca starch slowly and knead until dough is smooth, flexible and does not stick to your hands (don’t have to add all of the remaining 200g tapioca starch just enough to create a dough). Prove for ½ hour more. After the second proving add in the remaining tapioca starch to make a dry and crumbly yet moist dough. The dough should be crumbly but holds together when you shape it. Shape dough into small balls and bake at 275’F for about 20 mins. Let the cookies cool completely on the baking sheet before removing.

Note:
If dough is too moist the cookies will melt when you bake them, too dry and the cookies will come out rock hard, baking at high temperature will result in burnt cookies.


Texture of dough at 3rd stage, right before shaping the cookies.

This is a French dessert that made its way into Vietnamese Cuisine via the French colonization of Vietnam. Traditionally, Flan is usually baked in a water bath. However, ovens are rare in Vietnam and hard to operate (only serious or professional bakers own and know how to properly operate an oven). This is one of the reasons why Vietnamese cakes and pasties are usually steam, or boiled…very rarely baked. The steaming method is much faster than baking but harder to master. Heat from steam is nothing like heat from an oven. Therefore the “method” has to be slightly adjusted in order to render a desirable flan.

Caramel Sauce:
For every 3 tbs of sugar, add 1 tsp water. Boil the two together until golden carefully pour hot caramel into a “mould”. The caramel should harden when it cools.

Flan:
-6 eggs
-500g fresh milk or cream
-150g sugar
-1 tsp vanilla extract

What to Do:
Stir together eggs, sugar, milk and vanilla. Strain the mixture a few times. Pour mixture into prepared mould. Steam over high heat for 5 mins, lift steamer lid to release excess steam and steam for another 5 mins. Turn off the heat and let the flan cool in the steamer to room temperature.

Note:
Avoid agitating the eggs as much as possible. Less agitation means a smoother texture flan. The steaming time varies depending on the size of mould used. The main idea is to steam the flan ½ - ¾ cooked and let carryover heat do the rest of the work. Over steaming will negatively affect the texture.

Variations:
*Orange Flan: Add finely grated orange zest
**Coconut Flan: Use coconut milk in place of milk (or ½ coconut milk, ½ milk)
***Coffee Flan: Replace part of the milk with coffee (amount depends on your taste)
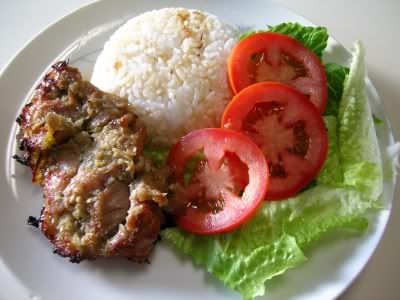
Recipe here, serve with rice and a healthy helping of fresh lettuce and tomatoes.

This is a French pastry that made its way into Vietnamese Cuisine via the French colonization of Vietnam. Known as Choux à la Crème, the Vietnamese translate it to Bánh Sữa or Bánh Sữa Nhân Kem (which means milk pastry/cake). Other names for this pastry include Bánh Xu or Bánh Su. “Xu or Su” is spelled from the Vietnamese pronunciation of the French word “Choux”. In the US they’re known as cream puffs. However, American cream puffs are usually filled with fresh whipped cream while the Vietnamese version is only filled with pastry cream. Vietnamese spin-offs have resulted in fillings of durian, coconut, or coffee pastry cream.

Pâte à Choux (Pastry):
-240g water
-125g flour
-5 eggs (250g)
-50g butter
-1 tsp sugar
-1/2 tsp salt if using unsalted butter

*Boil water, sugar, salt, and butter together. Add flour and stir dough over medium heat for about 5 mins or until not sticky when pinched. Cool for 5 mins and beat in eggs one at a time. Fit a star tip in a pastry bag and fill with dough/batter. Pipe round pastries on a baking sheet and bake at 350’f for about 20 mins or until golden. Cool pastries completely before filling.

Crème Pâtissière (Pastry Cream Filling):
-5 egg yolks
-500g fresh milk or cream
-125g sugar
-1 tbs custard powder (optional)
-1 tsp vanilla extract
-2 tbs corn starch (1 tbs if using custard powder)
-50g butter

*Beat together egg yolks, starch, and custard powder with sugar. Meanwhile boil the milk and slowly add ½ of the heated milk to the egg mixture while mixing constantly to keep the eggs from curdling. Add egg mixture into the pot with the rest of the milk and constantly stir over medium heat until thickened. Add butter and mix until melted. Cool cream before filling. If the cream looks a little thin…don’t worry it will thicken when it cools.

Variations:
*Coconut Pastry Cream: Replace milk with coconut milk/cream.
**Durian Pastry Cream: Replace sugar with durian flesh and add sugar to taste (if needed, durian alone should be sweet enough).
***Coffee Pastry Cream: Replace ½ or all of milk with coffee (depends on how strong you want the coffee taste to be.

What to Do:
Once pasties are cooled, use a knife or scissors to cut a small slit on the side of each puff. Fill with cooled pastry cream.

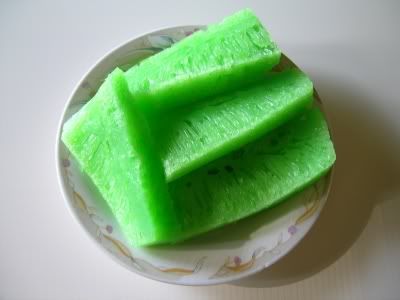
Recipe here, replace 1 cup water (when making syrup, step B) with pandan juice. Have Fun!